Tech Column: Five steps to recording perfect vocals
Phoebe Pope
Tuesday, June 1, 2021
Whether you've come up trumps with a recording studio at school, you're making do with a classroom and a piece of carpet, or you want to give your music tech students some pro production tips, Phoebe Pope covers all bases with her five-step approach to recording vocals.

gnepphoto
With new digital technology and software plugins claiming to turn your tracks from amateur to pro with the touch of a button, we can easily depend on these quick fixes to ‘save’ our track. Unfortunately, there's only so much software can do to improve a badly recorded vocal. This is why it is so important to get the recording sounding great first, without the need to ‘fix’ it in post-production.
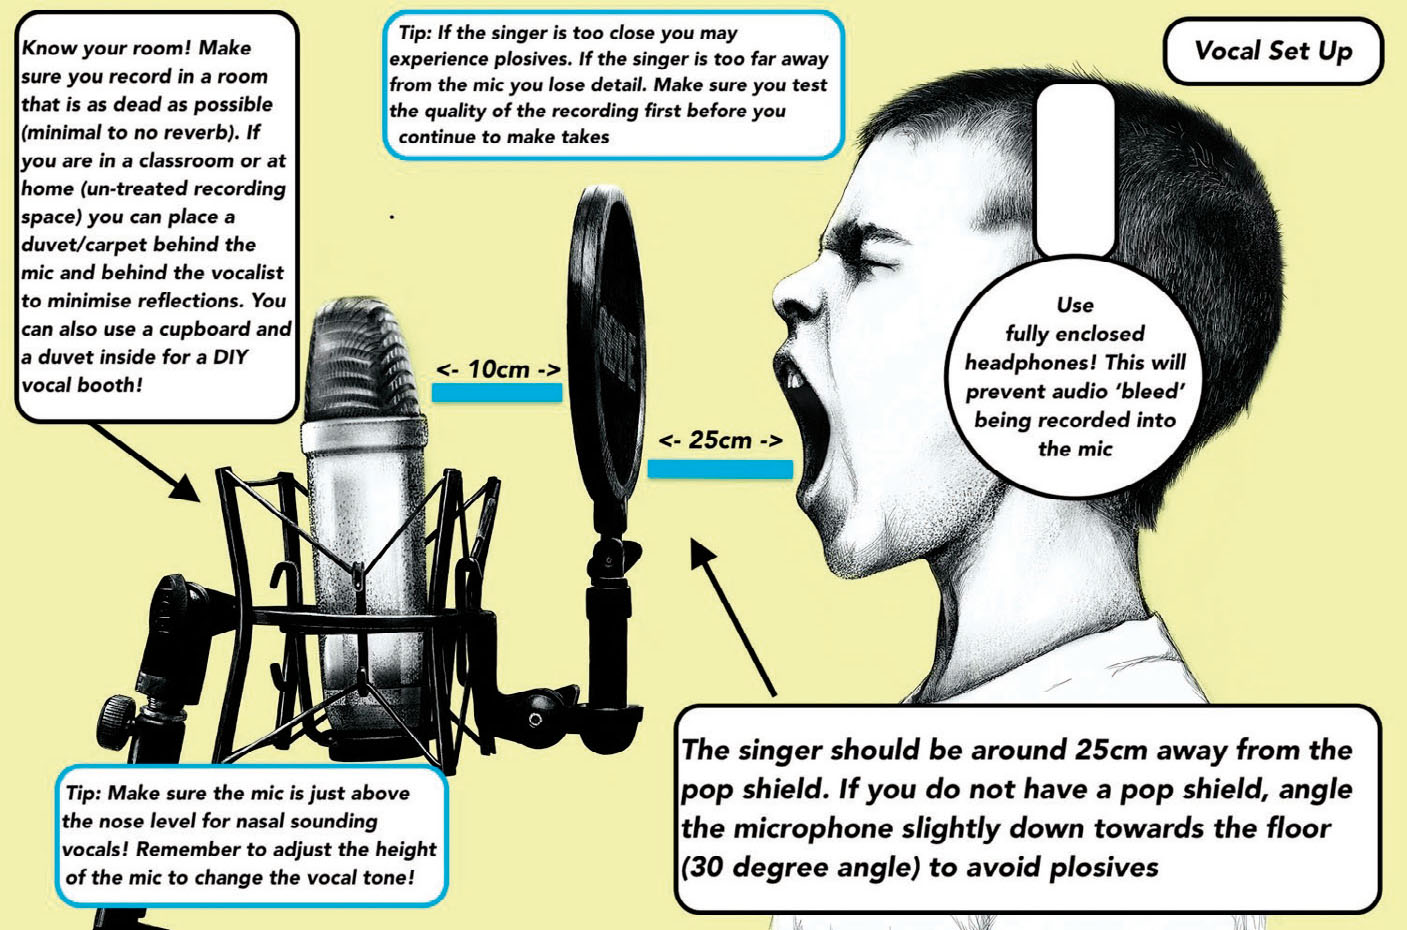
Step 1 – Vocal set up 101. Look at the diagram and follow each tip. It is important that you set up your mic and position the vocalist correctly before you start recording. These tips can be used at home, in the classroom, or in a studio. The principles of the set up remain the same.
Step 2 – A good vocal recording begins with a good headphone mix.
This is the key to ensuring your vocalist is happy with the way they sound through their headphones. Make sure you take guidance from your vocalist about what they want to hear in their headphone mix. Usually this is a balance between the volume of their vocals versus the backing track. Vocalists may also ask for reverb to be applied. If this makes your vocalist more comfortable with the recording process, do it!
Step 3 – Setting the correct recording level. This step is critical to ensuring a good mix later. Recording a signal that is too ‘hot’ or too loud will leave you no headroom when it comes to the final mix and master. Setting the recording level to ‘low’ will not capture detail within the vocal and will add noise (a grainy sound) if you try to boost the volume in post-production. First, get the vocalist to sing a section of the song and start to record. If recording digitally (at 24-bit) make sure you leave around -12–15dB headroom on signal peaks. Tip: Always watch the recording carefully throughout each take, making sure the level stays below the recommended dB.
Step 4 – Watch out for unwanted sounds. Before you embark on a recording adventure, make sure you listen to your demo takes to ensure there are not any unwanted sounds such as background noise, fuzz, cable interference, or headphone bleed. Be mindful of movement like feet tapping, clicking, head movement, and jewellery.
Step 5 – Final pro tips. Make sure you take your time, pace yourself, and be open to experimentation. Here are some final tips:
- Be prepared – the more prepared you are before the session the easier things will run and you will have more time to experiment. Make sure the vocalist knows the song and you know what parts need recording, doubled, which parts require harmonies, and adlib ideas.
- Be constructive with criticism – Make sure that the criticism is said in a positive, professional way. For example, ‘Let's try that take again, but this time, try experimenting with softer tone’.
- Take breaks – Make sure the singer is not experiencing vocal fatigue. Regular breaks and lots of water help avoid this. Taking breaks is also essential for you, as listening to the same parts repeatedly can cause ear fatigue.
- Keep things relaxed – As much as we strive for perfection, it is important to remember to enjoy the process. Things may take longer than expected or you might have a one take wonder.
- Practice makes perfect – Whether you are new to recording or a seasoned professional, there is always room to learn and develop your skill. Be open minded to trying new techniques and practice.
Phoebe Pope is a lecturer at BIMM Institute specialising in music technology, song writing and live performance, and also runs free workshops through BIMM for 16- to 18-year-old students. events@bimm.ac.uk.bimm.ac.uk