Practical Technology Column: Exporting audio
Tim Hallas
Wednesday, April 1, 2020
You've spent all your hours recording and mixing and you now need to export the audio. Tim Hallas refreshes your exporting skills.
Last month we looked at some of the basics of mixing, which is one of the most important stages of the recording process – but the subject of this article is an often-overlooked process that can make a recording perfect or a disaster! I'm talking about exporting the project at the end of the recording process. It sounds simple, but it's something my students seem to get wrong surprisingly often.
Exporting a track is something that we all need to do, whether we are collecting Year 9 music tech classwork or finishing Key Stage 4 performance recordings, or perhaps we are Key Stage 5 music technology students exporting our own recording coursework. We'll touch on basic mastering techniques in this article too, but the focus will predominantly be on ‘bouncing down’ (exporting) correctly.
File types
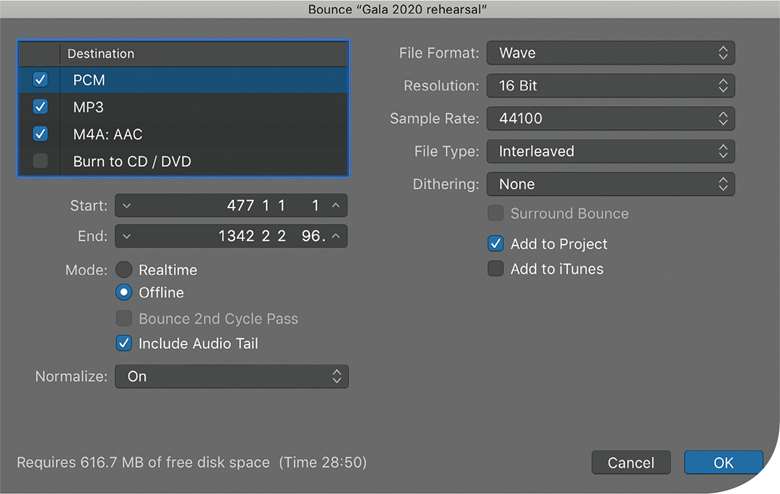
One of the questions I get asked most by my students is ‘What format do you want it in?’ By this, they want to know whether I want their recording as an MP3 (or similar) or a WAV file. The key difference between these file types is that one is compressed and one is uncompressed. A compressed file – such as MP3, M4A, AAC etc – reduces the quality of the audio to reduce the file size. The different file types do this in different ways using different algorithms, but the basic concept is the same.
To reduce the file size, a compressed file will reduce the dynamic range of the track (this is what compression is, after all!) so that the loud sounds will be less loud and the quiet sounds less quiet. This reduction in dynamic range means that a lower bit-depth is required in the accurate recreation of the audio. If you're listening to EDM or commercial pop that has a limited dynamic range anyway, the slight loss of dynamic range from compression is going to be less noticeable than if you are listening to a very delicate piece of choral music where the dynamics are crucial.
In addition to reducing the dynamic range, some compressed files also remove the frequencies above and below the human hearing range. This might not sound like much of a problem, but many sounds contain very complex harmonics that could include frequencies in those ranges. Although it won't affect the core sound, it will sound altered and like it's lacking some frequencies.
Given that compressed files reduce the dynamic range, it should now be apparent that uncompressed files do not do this. The audio in an uncompressed file will be exported with the same dynamic range it had when it was captured. Actually… this is half true. It depends on whether you were recording at 24–bit or 16–bit – but we'll leave that for another day!
Setting markers
One of the biggest problems I have when marking work that has been submitted from a DAW is that students (or possibly teachers?) have chopped off the beginning or the end. The way this is set varies in different DAWs, but the concept is the same. When ‘bouncing down’ the final project, the software will normally ask you to select the area you want to bounce. There are exceptions to this – Logic and Ableton will bounce down the entire project unless you tell them not to, but this can then create large amounts of silence at the end depending on how big the project has become.
It is best to set markers at the beginning and end of your project and listen to this on a loop to ensure that it starts and ends at exactly the point you want it to. Ensure that you have left enough time for any reverb to finish – nothing ruins a track like a reverb tail that has been cut off too quickly! Some programmes include a function to ensure that this happens automatically.
Mastering
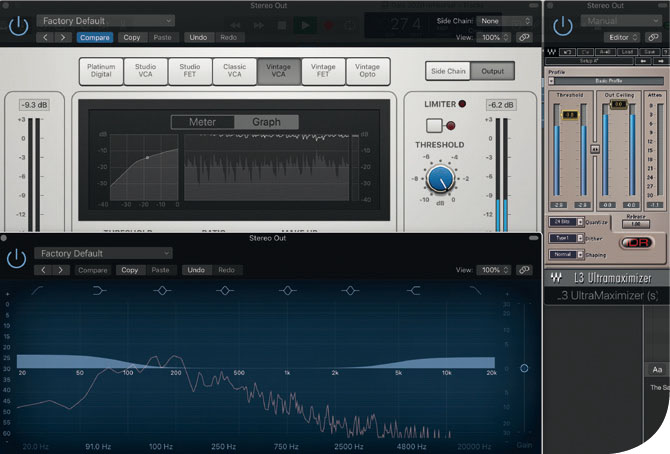
Mastering is a dark art and a specialism, even within the world of production. This involves final tweaks to the dynamics and EQ to the stereo track. Although you don't need to worry about this too much, putting a multiband compressor, a simple EQ and limiter on the output track can make a big difference to the power a track might have. If you don't understand too much about mastering, don't worry – there are lots of programmes designed to help you. Check out Tony Cliff's reviews in previous issues of MT of iZotope Ozone as one example.
E Mastering plugins
Summary
Getting the audio out of a track might seem incredibly obvious, but I see mistakes happening in this process countless times every term. It's worth revising the basics to ensure that we don't have wasted time when we come to mark work and find bits missing. The best way to ensure this happens well is to get students to listen through to their work before they hand it in – but if you can find a way to get students to do this consistently, please let me know!