How to use GarageBand in the Key Stage 2 music classroom
Kay Charlton
Saturday, January 1, 2022
Using a DAW (digital audio workstation) to teach primary music doesn't come naturally to everyone. Kay Charlton advocates having a go whatever your technological background, and demystifies GarageBand in nine simple steps.
dglimages/AdobeStock
I've written on several subjects for this magazine, yet a few years ago I couldn't have imagined I'd be confident enough to write about music technology. I taught myself GarageBand because I wanted to write music for teaching whole class brass; having a backing track for each piece was a crucial part of my concept, so I took the plunge and learnt a new skill. GarageBand comes free with Apple products – if you have an iPhone or iPad, you already have it and it is designed to be used by non-specialists, so there is nothing to stop you having a go. I've now upgraded to Logic and continue creating backing tracks, some of which are published resources, and I'm still learning!
In the classroom
My favourite features of the app are Smart instruments and Apple loops – automated functions that get music-making happening quickly, yet still depend on musical choices being made. A basic course of GarageBand can be taught over a half-term period, building a song track by track while encouraging children to make musical choices and express their musical preferences. As with any teaching, this should build on prior learning; children can't make decisions about drum patterns, instruments, chords or structure if these are foreign concepts.
The basis of any rock, dance, or pop song is the beat, so start with a drum track. Play a classic pop song while giving out iPads and explore how the music feels – move to the beat, count out loud and identify the sounds of the drum kit. Open the GarageBand app, tap the + to start a new song (in Tracks), scroll through the virtual instruments to find drums and tap on ‘Smart Drums’ (step 1). This opens a grid which is an algorithm – a set of rules or instructions. The components of the drum kit are on the right (snare, bass drum etc.) and can be dragged into the grid (step 2).
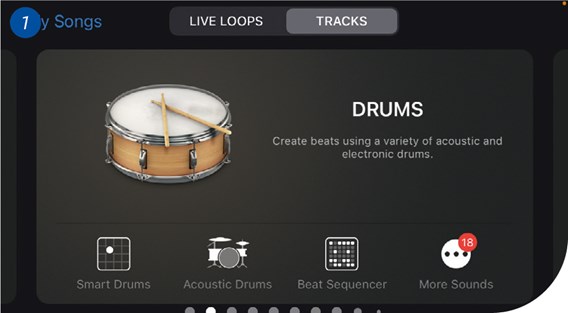
Step 1: Open Smart Drums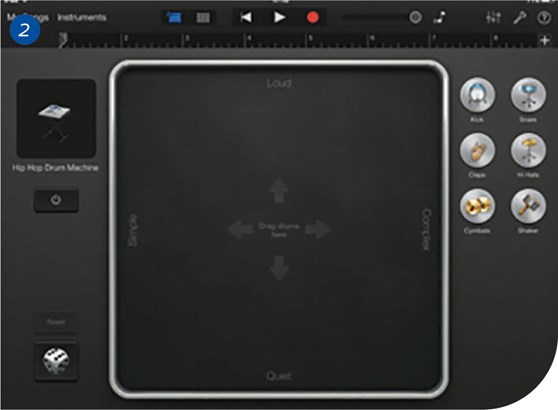
Step 2: Drag parts of the drum kit into the grid
First, demonstrate the sound of each instrument. If you have mirrored your screen onto the whiteboard, you can demonstrate the GarageBand instruments. If not, find virtual instruments so that children understand what constitutes a drum groove. Differentiation is made easy for you: tap the die and a drum pattern is instantly created; for those moving faster, explore the placement of instruments in the grid or change the type of drum kit (top left).
Children will be happy to explore drumming options for a while, which gives you time to go round to check on progress. Once everyone has a pattern they like (ask them why they like it), it is time to record the track. Tap the back button or drag the playhead to the beginning before you record – this is very important and ensures that your pattern records from the beginning. Tap the red ‘record’ button at the top; GarageBand counts in with four clicks and automatically records the drums, stopping after eight bars. A red line shows the recording process and goes green once completed (step 3). Tap the track symbol to see your drum track (it looks like a brick wall); you should have an eight-bar drum loop (step 4).
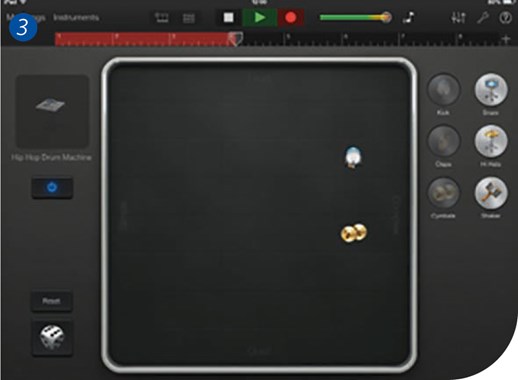
Step 3: Recording is completed. Tap the track symbol to see your drum track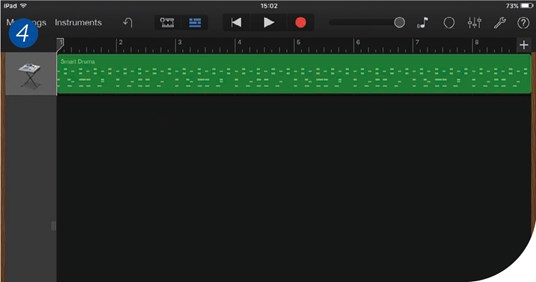
Step 4: Press play to hear your track. Press the back button to rewind
At the end of the lesson tap ‘My Song’ to save and name your song – each child's name and class is enough for now; later children may want to invent a title. Have a short discussion with your pupils about why they chose their drum pattern. If possible, listen to a few tracks and discuss what people like about it – is it simple or complex, does it make you want to dance, does it remind you of a song you know? Take your time finding your way around the app in this first lesson. Building your song by adding other tracks follows the same sequence, and as the weeks go on, familiarity with the process can free children up to make creative decisions about the way their music sounds.
The next step is to add a bass guitar track (step 5) and the sequence is very similar. Start by listening to music that features the bass guitar and the important relationship between drums and bass (Another One Bites the Dust by Queen springs to mind). This time we will use ‘autoplay’ (step 6) – 1 is a simple pattern, 4 is complex. Tap the note C to start/stop, and tap the ‘play’ arrow to start your drum track. Practise playing eight beats of C and eight of G with the drums.
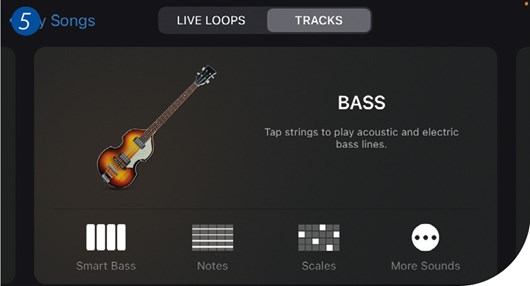
Step 5: Smart bass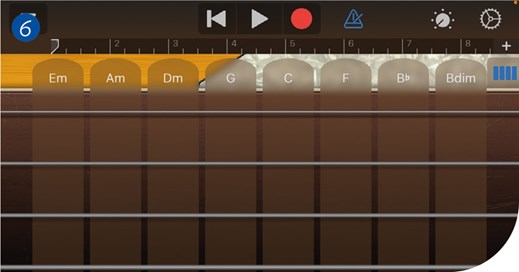
Step 6: Autoplay, make sure chords is highlighted
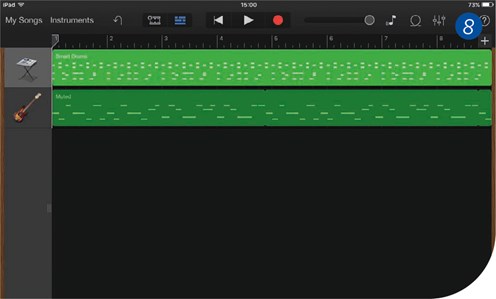
Experiment with different instruments and autoplay settings and encourage your class to make musical choices about how they want their song to sound. When you're ready, record your bass line – make sure the playhead is at the beginning. Listen back to your two tracks (step 7). In the following lessons, add more instruments to your song using the same sequence – like guitar, piano/keyboard, strings, instruments from different cultures – always taking care to play the same chord sequence and deciding which instrument and which autoplay pattern to use.
Soon you will be ready to introduce Apple loops. There are hundreds, so start with percussion instruments that won't clash with your chord sequence. Simply drag loops into the workspace (step 8). This is a good time to think about the structure of the song: should all your loops start at the beginning? Can you add layers to the texture? Again, make sure children are making critical choices (‘why did you choose these loops?’). You can also record vocals, a chorus, or a rap using the Audio Recorder (step 9) and it's fun to add effects too.
Step 8: Drag the loop across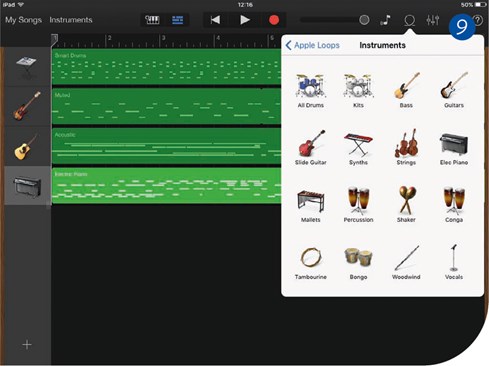
Step 9: Audio recorder
Musical outcomes
GarageBand is an accessible route to creative music making. Children can use their imagination to compose while making musical choices using the inter-related dimensions of music (timbre, texture, structure, etc.) and understanding how to manipulate a DAW. Every song will be unique and younger children will start to form opinions about what music they like and why. As a teacher, don't be daunted if this is new to you, you can't ‘break’ it and you can undo mistakes just like any other computer programme. So, get creative and make some tracks!
‘GarageBand enabled each and every child to explore the different components that create a piece of music. Teaching this step-by-step, focusing on a musical component each week, allowed students to understand the complexity and depth of a piece of music. I think this gave them a greater understanding and appreciation of what is involved when listening or composing a simple tune. GarageBand has a plethora of instruments and sounds to experiment with, and I found this allowed the children to be creative and have fun exploring new sounds and rhythms.’ Ms Melchor-Bray, Year 3 teacher
Top tips for the classroom
- Listen to real music and discuss styles, structure and instruments.
- Keep each track simple – aim for a coherent song with tracks and instruments that complement each other.
- Make sure children get the same iPad each week!
- Save your song at the end of each session.
- Use over-ear headphones and keep the volume down.
- Get help from someone technical to get set up in class.
- If you get stuck, search for tutorials online.
Meet the National Curriculum aims for KS2
- Develop an understanding of musical composition.
- Organising and manipulating ideas within musical structures.
- Playing [virtual] musical instruments with increasing accuracy, fluency and control.
- Compose music for a range of purposes using the inter-related dimensions of music.
Differentiation options
- Use only one chord, or a complex chord sequence.
- Older children could play live instruments along with their track.
- Experiment with effects or live loops.
- Add more sections to extend the song.
- Set up a school record company!
Other DAWs
- Soundtrap
- Audacity
- Pro Tools First
- Cubase LE
- Cakewalk by BandLab
- Ableton Live Lite